Not a student but want more information about Seattle pottery classes?
Visit my website: Barbara Dunshee CeramicsFirst we (thanks Paul!) cut the 55 gallon drum barrel down to size. It's now 23 inches in diameter and 24 inches tall.  I then drill about 26 1/2 inch holes around the base and four in the very bottom, so the fire gets some good updraft.
 I place spacers and a broken kiln shelf over the four in the bottom. The spacers are for additional draft.
 For this mini mini firing I sprinkle a little sawdust in the bottom
 This face I'm wrapping with salt soaked rag, a little copper tape.
 This face gets a little stainless steel scrubby and a dried banana peel
 I nestled them face down in the sawdust sprinkle on a little red iron oxide and add a little bit of dried grass around one of them
 On top of that I had dried pine needles
 I had some fine tingling that had been painted with a little whiteTempera. Temper it is not for effect it's just what I had
 A few sheets of phonebook paper crumpled
 Light that and add some cedar scraps
 For this mini mini firing I'm letting it burn about 30 minutes
 And then I'm placing an upturned oil pan down over that small firing to keep it in reduction
 And letting it smolder for another half an hour
 Smoldering
 Removed the oil pan to find pretty good combustion during the short test.
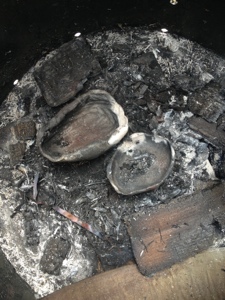
Faces rinsed and scrubbed. Some nice blackening, a tiny touch of green and some subtle iridescence. I'm pleased with the way the barrel handled the flame and combustion. I'm pleased with the look of these pieces. I'm pleased that they didn't crack! Not bad for a quick test! We'll see if we can do even better on Saturday!


1 comment:
Woah! That's quite a process. I'm excited for this :-)
Post a Comment